


If you choose to use Docker to work with WordPress, you’ll find that everything is easier and faster. With a simple configuration, we can start a project without the need to use XAMPP, WAMPP or any other local environment.
In addition, with Docker we can always switch to different versions of PHP, MySQL or any tool we need.
Basic requirements:
- Having basic skills in Docker and WordPress.
- Having Docker installed.
Docker Images:
- WordPress
- MySql
- PHPMyAdmin
- Composer (Optional)
- NodeJS — NPM (Optional)
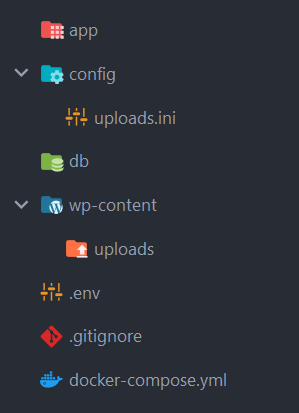
Project design:
- app | Source code of the theme
- wp-content / uploads| Images that you’ll upload in WordPress.
- config / uploads.ini | Configuration file for PHP.
- db (Optional)| Folder where you’ll save the database backups.
- .env | Environment variables to use in docker-compose.
- docker-compose.yml
Configure services with docker-compose.yml:
We’ll start with a basic configuration and then add the services we need.
version: "3"

services:

networks:
  wp_net: {}

volumes:
  db_data: {}
  wp_data: {}
We’ll also need to provide the environment variables that our services will use in the docker-compose.yml file.
Here we’ll open our .env file and add the following environment variables:
APP_NAME=ProjectName
MYSQL_USERNAME=root
MYSQL_ROOT_PASSWORD=root
DB_NAME=wp_db
DB_USER=wp_db_user
DB_PASSWORD=wp_db_pass
MySql Service:
In this service we will use the MySQL image in its latest version, although we can also use a specific version, for example mysql:5.7.
Here we’ll automatically set the user, password and database that WordPress will use later.
database:
  image: mysql:latest
  container_name: ${APP_NAME}_database
  command: --default-authentication-plugin=mysql_native_password
  volumes:
    - db_data:/var/lib/mysql
  restart: always
  ports:
    - 3306:3306
  environment:
    MYSQL_ROOT_PASSWORD: ${MYSQL_ROOT_PASSWORD}
    MYSQL_DATABASE: ${DB_NAME}
    MYSQL_USER: ${DB_USER}
    MYSQL_PASSWORD: ${DB_PASSWORD}
  networks:
    - wp_net
WordPress Service:
As with MySQL, here we can also choose the WordPress version we want.
And we’ll generate the data base connection too.
wordpress:
  image: wordpress:latest
  container_name: ${APP_NAME}_wordpress
  volumes:
    - "./config/uploads.ini:/usr/local/etc/php/conf.d/uploads.ini"
    - wp_data:/nas/content/live/bitskingdom
    - "./app:/nas/content/live/bitskingdom/wp-content/themes/custom-theme/app:rw"
    - "./wp-content/uploads:/nas/content/live/bitskingdom/wp-content/uploads:rw"
  ports:
    - 80:80
  restart: always
  environment:
    WORDPRESS_DB_HOST: database:3306
    WORDPRESS_DB_NAME: ${DB_NAME}
    WORDPRESS_DB_USER: ${DB_USER}
    WORDPRESS_DB_PASSWORD: ${DB_PASSWORD}
    WORDPRESS_DEBUG: 1
    WORDPRESS_CONFIG_EXTRA: |
      /* wpconfig */
      define( 'FS_METHOD', 'direct' );
  depends_on:
    - database
  networks:
    - wp_net
PHPMyAdmin Service:
phpmyadmin:
  image: phpmyadmin/phpmyadmin
  container_name: ${APP_NAME}_phpmyadmin
  volumes:
    - "./config/uploads.ini:/usr/local/etc/php/conf.d/uploads.ini"
  ports:
    - 9090:80
  environment:
    MYSQL_USERNAME: ${MYSQL_USERNAME}
    MYSQL_ROOT_PASSWORD: ${MYSQL_ROOT_PASSWORD}
    PMA_HOST: database
  depends_on:
    - database
  networks:
    - wp_net
At this point we can test from our end.
We choose the route project location and execute:
docker-compose up -dThen we can check which contents are being executed:
docker ps
We can also check from a browser the status of the services:
- WordPress => http://localhost/
- PHPMyAdmin => http://localhost:9090 (user: roor, pass: root)

Now we can configure and install our WordPress, but we will not be able to install or uninstall plugins because, for that, we must change the permissions of the wp-content folder in the WordPress container.
We’ll change these permissions in the following way:
docker exec -ti [CONTAINER_NAME] sh -c "chown -R www-data:www-data wp-content"[CONTAINER_NAME] must be replaced by the name of the container that is running.
At this point, we can start working with our custom theme for WordPress. Inside the app folder we’ll create only 3 files, the basics for any theme:
There is no need to run docker-compose up -d again since all the work we do inside the app folder is mirrored in the WordPress container.
To cancel the docker services or containers we have to execute:
docker-compose downWell, so far, we have all this configuration in the file docker-compose.yml :
version: "3"

services:
  database:
    image: mysql:latest
    container_name: ${APP_NAME}_database
    command: --default-authentication-plugin=mysql_native_password
    volumes:
      - db_data:/var/lib/mysql
    restart: always
    ports:
      - 3306:3306
    environment:
      MYSQL_ROOT_PASSWORD: ${MYSQL_ROOT_PASSWORD}
      MYSQL_DATABASE: ${DB_NAME}
      MYSQL_USER: ${DB_USER}
      MYSQL_PASSWORD: ${DB_PASSWORD}
    networks:
      - wp_net

  # docker exec -ti [CONTAINER NAME] sh -c "chown -R www-data:www-data wp-content"
  wordpress:
    image: wordpress:latest
    container_name: ${APP_NAME}_wordpress
    volumes:
      - "./config/uploads.ini:/usr/local/etc/php/conf.d/uploads.ini"
      - wp_data:/nas/content/live/bitskingdom
      - "./app:/nas/content/live/bitskingdom/wp-content/themes/custom-theme/app:rw"
      - "./wp-content/uploads:/nas/content/live/bitskingdom/wp-content/uploads:rw"
    ports:
      - 80:80
    restart: always
    environment:
      WORDPRESS_DB_HOST: database:3306
      WORDPRESS_DB_NAME: ${DB_NAME}
      WORDPRESS_DB_USER: ${DB_USER}
      WORDPRESS_DB_PASSWORD: ${DB_PASSWORD}
      WORDPRESS_DEBUG: 1
      WORDPRESS_CONFIG_EXTRA: |
        /* wpconfig */
        define( 'FS_METHOD', 'direct' );
    depends_on:
      - database
    networks:
      - wp_net

  phpmyadmin:
    image: phpmyadmin/phpmyadmin
    container_name: ${APP_NAME}_phpmyadmin
    volumes:
      - "./config/uploads.ini:/usr/local/etc/php/conf.d/uploads.ini"
    ports:
      - 9090:80
    environment:
      MYSQL_USERNAME: ${MYSQL_USERNAME}
      MYSQL_ROOT_PASSWORD: ${MYSQL_ROOT_PASSWORD}
      PMA_HOST: database
    depends_on:
      - database
    networks:
      - wp_net

networks:
  wp_net: {}

volumes:
  db_data: {}
  wp_data: {}
We shouldn’t have any problem working with our custom theme, but at this point we can add more services and increase the productivity of our local environment.
For example, we’ll add WP-CLI, Composer and NPM:
WP-CLI Service:
cli:
  image: wordpress:cli
  container_name: ${APP_NAME}_cli
  user: xfs
  volumes:
    - wp_data:/nas/content/live/bitskingdom:rw
  environment:
    WORDPRESS_DB_HOST: database:3306
    WORDPRESS_DB_NAME: ${DB_NAME}
    WORDPRESS_DB_USER: ${DB_USER}
    WORDPRESS_DB_PASSWORD: ${DB_PASSWORD}
  depends_on:
    - database
    - wordpress
  command: "tail -f /dev/null"
  networks:
    - wp_net
Example: to get the list of plugins installed in WordPress.
docker-compose run --rm cli wp plugin listComposer Service:
composer:
  image: composer:latest
  container_name: ${APP_NAME}_composer
  volumes:
    - "./app:/nas/content/live/bitskingdom/wp-content/themes/custom-theme/app:rw"
  working_dir: /nas/content/live/bitskingdom/wp-content/themes/custom-theme/app
  networks:
    - wp_net
Example:
docker-compose run --rm composer --helpNPM Service:
npm:
  image: node:14
  container_name: ${APP_NAME}_npm
  volumes:
    - "./app:/nas/content/live/bitskingdom/wp-content/themes/custom-theme/app:rw"
  working_dir: "/nas/content/live/bitskingdom/wp-content/themes/custom-theme/app"
  entrypoint: ['npm']
  networks:
    - wp_net
With this service we will be able to execute any npm command.
Example:
docker-compose run --rm npm init -yTo test these new services we must execute:
docker-compose up -dContainer logs:
docker logs -f [CONTAINER_NAME]Example:
docker logs -f ProjectName_wordpress
Backup Database
We can create backups of our database by using the same MySQL service or PHPMyAdmin. In general, I prefer to do it from PHPMyAdmin, because it allows me to include some additional options to avoid problems with our project when performing a new import. (User: root, Pass: root)


Conclusion
This is my first post, I hope you find it useful!
GitHub repository: https://github.com/michaelcardoza/wp-docker
You can check out the following websites we created using this procedure:
